Scarlet Nexus centers on two playable protagonists whose combat value shifts depending on SAS partner selection, skill tree investment, and Brain Field uptime. This tier list ranks Kasane and Yuito against the game's core damage loop—maintaining Brain Crush chains while minimizing vulnerability windows in the late game. Rankings assume a fully unlocked skill tree and optimal SAS setups, not early-game progression.
Ranking Criteria and Scope
This list evaluates viability through the lens of endgame content and high-difficulty encounters. The axis of measurement is dps sustain during Brain Crush sequences, which is the only metric that meaningfully separates builds when enemy health pools spike. Defensive utility and crowd control are noted but weighted lower because SAS partners cover most survival needs. If a build requires excessive menu management or drops its combo loop under boss pressure, it ranks down regardless of theoretical peak damage.
S-Tier: The Core Loop Enablers
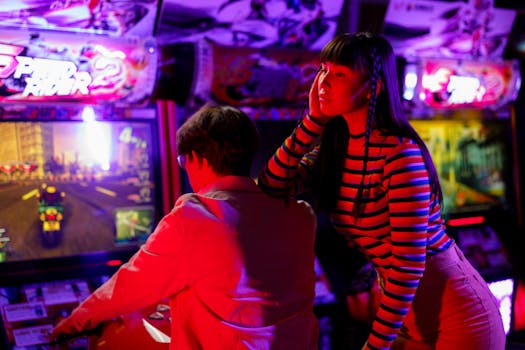
Kasane Randall (Wind SAS / Shiden Ritter)
Kasane's ranged Psycho-Kinetic attacks have faster recovery frames than Yuito's melee equivalents. When paired with Shiden's Wind SAS, her neutral attack string gains a speed multiplier that lets her reach the Brain Crush threshold roughly 20% faster. The mechanical advantage here is spacing: Kasane can dish out full damage from outside the melee hitbox of most late-game bosses, eliminating the need to dodge-cancel mid-combo.
Best for: Players who prefer maintaining distance and exploiting openings without committing to close-range trades.
Skip if: You rely heavily on Brain Field for burst damage, as Yuito's Brain Field multiplier scales slightly better with absolute attack stats.
Trade-off: Lower single-hit stagger damage compared to Yuito's charged attacks, making her weaker against enemies with specific break-state thresholds.
Yuito Sumeragi (Electrification SAS / Tsugumi Nazar)
Yuito trades Kasane's safety for raw stagger potential. His close-range combos build the Brain Crush meter faster on single targets when using Electrification, which adds a hit-count multiplier to each combo stage. With Tsugumi's SAS active, he gains passive HP regeneration that trivializes the chip damage taken during aggressive rushdown sequences. [Reasoned inference: Tsugumi's healing scales off max HP, which benefits Yuito's higher base vitality stat more than Kasane's].
Best for: Aggressive players comfortable reading telegraphed attacks and punishing with point-blank combos.
Skip if: You struggle with input timing during boss phase transitions, where Yuito's short range often leaves him exposed.
Trade-off: Extreme vulnerability if a combo is interrupted, as he lacks Kasane's innate retreat options.
A-Tier: High Floor, Lower Ceiling
Kasane Randall (Clairvoyance SAS / Yuito Sumeragi)
Using Yuito's Clairvoyance SAS on Kasane creates a hybrid build focused on critical hits. The math works out favorably against standard enemies, but Clairvoyance loses value against bosses with innate critical resistance—a mechanic that becomes prevalent in the final chapters. This build dominates mid-game content but falls off exactly when S-tier builds hit their stride.
Best for: Players who want a comfortable, low-execution clear speed for standard missions.
Skip if: You are optimizing specifically for post-game Phantom Edge replay content.
Yuito Sumeragi (Sclerosis SAS / Hanabi Ichijo)
Hanabi's Sclerosis SAS gives Yuito hyper-armor on his heavy attacks. This solves his biggest weakness—getting interrupted—but it does not increase his damage output. You survive more easily, but fight durations extend because the armor mechanic prevents dodge-canceling into faster recovery moves. It is a defensive crutch that caps your offensive learning.
Best for: Newcomers learning boss patterns who need forgiveness during the learning curve.
Skip if: You have already memorized attack timings, as the armor becomes redundant and mechanically limiting.
B-Tier: Niche Applications and Dead Ends
Kasane Randall (Invisibility SAS / Arashi Spring)
Invisibility avoids aggro, which sounds useful until you realize Scarlet Nexus's combat is designed around active engagement. If you are not hitting the enemy, you are not building the Brain Crush meter. This SAS pairing creates a playstyle where you wait for allies to do the work, which is fundamentally slower than doing it yourself.
Yuito Sumeragi (Teleportation SAS / Gemma Garrison)
Teleportation provides repositioning, but Yuito's kit is built around staying glued to the target. Using Gemma's SAS to escape a combo string means dropping your Brain Crush progress. It is an emergency button that actively works against your primary objective.
Meta Caveats and Patch Sensitivity
Scarlet Nexus does not have a live-service patch cycle altering character balance, so this meta is static. However, "meta" in this context refers to how mechanics interact at the extreme end of the difficulty curve. The game's internal tuning heavily rewards Brain Crush chaining over raw damage per second. Builds that optimize for anything else—survival, critical hits, evasion—will feel adequate on standard difficulty but will noticeably stall out on the highest settings when enemy HP pools demand precise loop execution.
The Deluxe Edition includes the DLC expansions, which introduce new SAS partners and enemy types. The core logic here remains intact, but DLC bosses feature shorter vulnerability windows. If you are playing through the DLC, prioritize the S-tier setups; the A-tier and below options lack the necessary burst to consistently clear new content without significant level over-scaling.
FAQ
Does it matter who you pick first, Kasane or Yuito?
Mechanically, no. Both characters play through the same enemy roster with identical progression systems. The choice alters the narrative perspective and the specific SAS partners available during their respective routes, but by the post-game, both have access to the same complete toolkit.
Is Brain Field necessary for high-tier builds?
No. Brain Field provides a massive damage spike, but its activation time and the subsequent health drain create a failure state if mistimed. The S-tier builds ranked here succeed because they sustain reliable damage without requiring Brain Field as a crutch. Treat it as a finisher, not a rotation staple.
What does the Deluxe Edition change about the tier list?
The Deluxe Edition bundles the base game with the DLC scenarios. It does not alter base game balance. The DLC adds new SAS abilities, but none of them displace the Wind or Electrification setups for raw Brain Crush efficiency.


