The biggest mistake new players make is spending their first hour in the garage perfecting a mech. Don't. The tutorial lets you build in isolation, but the real game is about how parts behave under fire, not how they look on a stat sheet. Your first hour priority should be: run the earliest combat missions with deliberately bad builds, watch what breaks, then rebuild based on failure data rather than theory. Currency is tight early, and every part you scrap without field-testing is money you don't get back.
The Tutorial's Blind Spot: Physics Matter More Than Numbers
Custom Mech Wars Ultimate Edition hands you a clean interface with attack values, weight limits, and energy bars. What it doesn't explain is how center-of-mass shifts during thrust, how weapon recoil stacks when you cluster similar parts, or how limb damage propagates differently on bipeds versus quadrupeds. These aren't bonus mechanics. They're the difference between a mech that completes missions and one that face-plants into a building because you mounted heavy cannons on a light torso.
Here's the hidden variable most players miss: stability budget isn't just about staying upright. Every mech has an invisible threshold where accumulated momentum from weapons fire, enemy impacts, and your own boosters triggers a stagger state. The UI shows "Stability" as a bar. It doesn't show that stagger threshold drops as limbs take damage, or that diagonal weapon mounts create torque that drains stability faster than symmetrical layouts. I've watched players stack four identical rifles on one shoulder because the raw DPS number looked good, then wonder why their mech spins 30 degrees off target every burst.
The practical shortcut: build your first mech with weapons mirrored left-right, even if it costs you optimal firing angles. Test it. Then deliberately build an asymmetrical version of similar weight and run the same mission. The difference in controllability will teach you more than any tooltip.
Another under-explained system: part degradation isn't cosmetic. Weapons lose accuracy. Legs lose thrust efficiency. The game flashes warnings at critical damage but never explains that degraded parts still function at reduced capacity, which means you can finish a mission with a smoking wreck and not realize you were fighting at 40% effectiveness for the last five minutes. Check part condition in the post-mission breakdown, not just the binary "destroyed / functional" status.
The currency trap: early missions reward parts more than money. Scrapping duplicate parts seems efficient. It isn't. The upgrade system later requires specific part types as fodder, and early "junk" parts become bottleneck materials. Hoard until you understand the upgrade tree, or you'll grind retroactively.
The Three Decisions That Lock In Your Arc
After the first hour, you'll face a branching point that most players sleepwalk through. These three decisions shape whether you're struggling in midgame or accelerating:
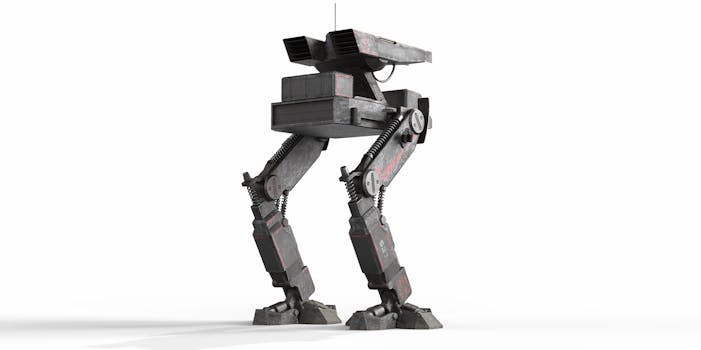
1. Biped, Quadruped, or Hover Base?
This isn't aesthetic. Bipeds have the highest stability ceiling but the lowest floor—they're great when intact, terrible when damaged. Quadrupeds sacrifice raw speed for consistent performance across damage states; you trade burst mobility for reliability. Hover bases ignore terrain entirely but bleed energy constantly and can't brace against recoil effectively.
The trade-off most people miss: biped leg parts have the widest upgrade path and the most compatibility with late-game torsos. If you commit to quadruped early, you're not locked out of biped later, but you'll have invested upgrade materials into a chassis type that doesn't share parts. The safe beginner choice is biped, not because it's best, but because mistakes are cheaper to correct.
2. Energy Weapon vs. Kinetic Commitment
The game lets you mix freely. You shouldn't, early. Energy weapons scale with generator output and benefit from sustained fire. Kinetics scale with ammunition capacity and benefit from burst windows. Hybrid builds split your upgrade path and create timing conflicts—energy weapons want you holding triggers, kinetics want you firing in controlled bursts with repositioning between.
The hidden variable: heat management isn't just about overheating. Sustained energy use degrades your generator faster than intermittent use, which means a "safe" heat build that never redlines still costs you long-term part durability. Kinetic builds avoid this but require ammo reserves that eat weight budget. Choose one philosophy for your first ten hours. Specialize later when you can afford duplicate loadouts.
3. Which Faction Missions to Accept
Mission selection isn't neutral. Early faction alignment determines which part suppliers unlock, and supplier reputation gates access to experimental parts that don't appear in the generic store. The game presents this as "choose your preferred mission type." It's actually "choose your part ecosystem."
The non-obvious insight: faction mission rewards are front-loaded with currency but back-loaded with unique parts. If you spread yourself across three factions early, you get more money but slower access to their signature components. If you commit to one, you hit part droughts where their specific components would solve your build problems. The practical compromise: pick two factions with complementary part focuses—one specializing in mobility, one in weapons—and ignore the third until you've established a functional baseline build.
Time Wasters and Recovery Moves
These specific mistakes burn hours:
- Over-optimizing paint and cosmetic joints before understanding hitboxes. Hitboxes are part-specific and larger than visual models suggest. That sleek narrow torso you spent twenty minutes shaping? Same hitbox as the bulky default. Build functional first, pretty later.
- Selling "obsolete" parts after every mission. The crafting system consumes parts as materials. Early common parts become uncommon crafting inputs later. Bank everything until you know the full recipe tree.
- Ignoring the test range's moving targets. Static testing shows DPS. It doesn't show lead time, spread bloom under sustained fire, or how recoil affects aerial targeting. The moving target suite is buried in a submenu. Use it before every new weapon purchase.
- Chasing "S-rank" on early missions. Rank rewards are marginal until higher difficulties. Finishing faster with a B-rank and intact parts beats S-rank with three destroyed components and repair costs. Speedrun prestige later. Survive now.
If you've already committed to one of these traps, the recovery move is identical: stop progressing story missions, return to the earliest repeatable mission with your current build, and test whether your actual performance matches your assumed performance. The gap between those two numbers is what you fix next.

What to Do Differently Tomorrow
Stop treating the garage as your home base and the battlefield as the test. Reverse it. The garage is where you document what the battlefield taught you. Run ugly. Run broken. Run deliberately wrong to find where the system's edges are. The players who plateau in Custom Mech Wars Ultimate Edition are the ones who built one decent mech and refined it to death. The ones who accelerate are those who built ten terrible mechs, understood why each failed, and kept the failure data.
Your next session: pick one rule from this guide that contradicts how you've been playing. Apply it for two hours. Ignore everything else. The game rewards depth of understanding over breadth of features unlocked.


